


After colouring a recent sugar nellie simply adorable stamp (Joy), a few people commented that they find these stamps a bit daunting to colour in !!! maybe because they are more realistic looking than most stamps!.. so i thought i would share with you how i did my most recent card - the colours used and how I did it.
Firstly i would like to state that i am certainly no expert!!!! seriously!.. i have learnt through trial, error and experimentation and this tutorial only shows how I do my colouring in and how I find it comfortable to do so. There are plenty of fabulous peeps out there that are much better than me but this is my way of doing it xxx

ok to start I have showed what you will end up with if you follow this tutorial to the ' T '... i have chosen to do a mousy blonde hair and a duck egg and buttermilk clothing.
ok first of all the skin..

for a fair skinned child I like to use Blush, Vanilla and Ivory with a soft peach OR sunkissed pink for a rosy cheeked look. In this tutorial I used sunkissed pink. Now i always start with my darkest colours first. some people do it the other way round but this is what works for me.

So first I have added the rosy cheeks using sunkissed pink. Nice round cheeks to the side and a slight extension up the left hand side of the face as this will be in shadow. when you first use this colour it will seem really dark and you might have a bit of an 'OHHH MY GOODNESS' moment but dont worry! it does tone down as we go along
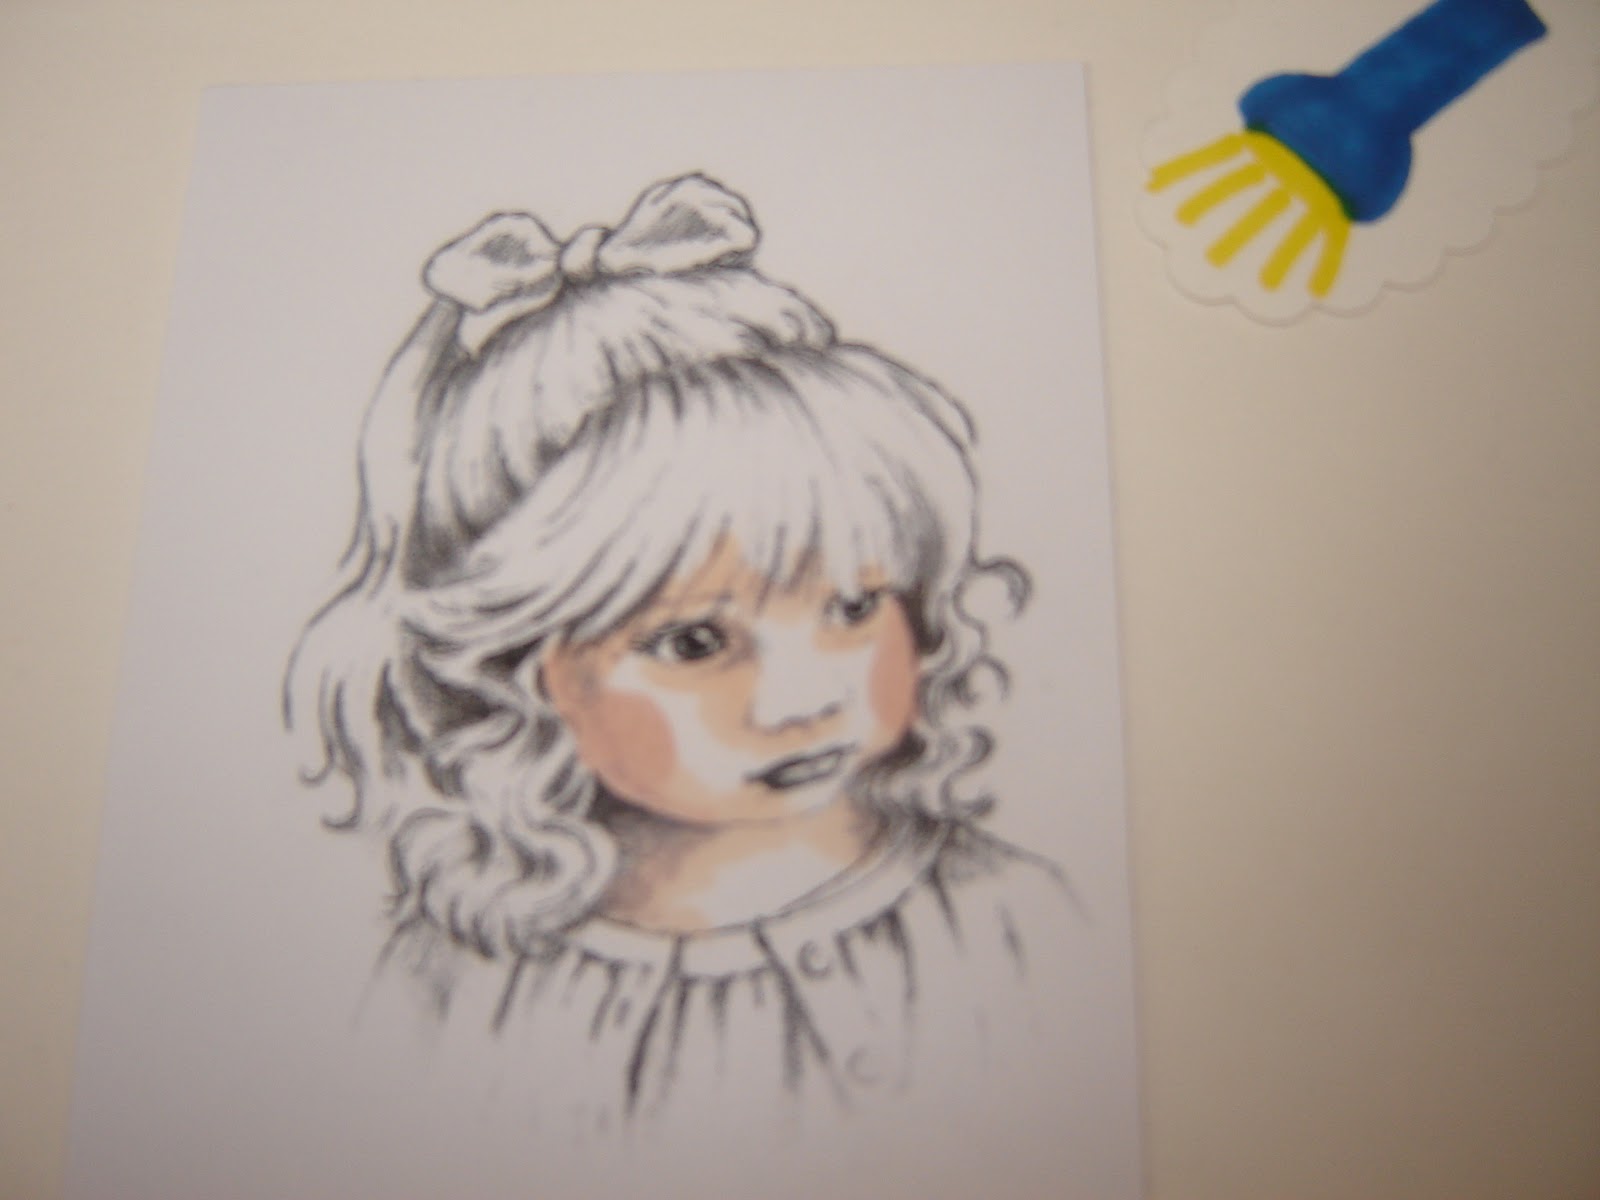
To help show where highlights and shadow should be I always imagine a light source shining on the picture. to represent this i have popped a little torch there to help you!
Any prominent bits will have a shadow behind it ie. the nose and under the fringe and chin. I have used 'blush' to add the shadow to the skin. So go under the fringe, round the side and under the nose, under the eyes, under the chin and round the side of the face and neck as shown.

Now use 'Vanilla' to go over where you have already coloured in and a bit futher into the face. Use small circular movements to blend the colours together. Remember to leave the nose, chin and a patch of cheek and the center of the neck as these are areas that will have light on them so will need to be lighter coloured.

now take 'Ivory' and go over everywhere. I use the bigger tip of the pen and again with circular motions blend all the colours together. using the lightest colour last will have a slightly bleaching effect on the darker colours and will tie them altogether. remember not to colour in her eyeballs or she will look jaundiced hehe!!

to finish off the face, add a tiny bit more sunkissed pink to the cheeks and blend with ivory again, add a touch of sunkissed to the lips and a touch of colour to the iris of the eyes (leave the glint clear), I used china blue as I like blue eyes - the choice is yours.
the face is now finished. it may still look a bit dark but dont worry as the colours pale out a bit when the alchohol evaporates and it dries out.

Now for the hair. there are many different versions of hair colours but for this tutorial i have done one of my favourites 'mousy blonde'.
For this i use cinnamon, caramel, sandstone and satin. you can use ivory instead of satin but i find satin nice as it keeps the warm golden blonde tone better.

again starting with the darkest colour 'cinnamon' colour in the darkest areas. This is where the partens, under the bow, along the hair 'lines', on the very tips of the hair and in the kinks of the curls. This stamp is quite good as some of the dark areas are printed out with the stamp - so where its dark go over with 'cinnamon'. dont go too far into the hair as you need to leave room for the other colours.

now using 'caramel' go over what you have already done and a little bit futher in, using small circular motions to blend

using 'sandstone' do the same again but leave a tiny slither without colour. this will be the final highlight.

to finish the hair take 'satin' and using the large end of the pen go over all of the hair to blend it all together.

ok skin and hair done - now onto the clothes!! this is personal choice and i usually do them to match up with the colours used in the backing papers so it all ties toghether nicely. any colours can be used if you have at least 2 hues of the same colour - one for the shadow and one for the hightlight.
for mine ive used buttercup and primrose for the blouse and duck egg, cool aqua and tea green for the cardigan.

starting with the darker hue 'buttercup' do along the folds of the blouse and where it lies behind the cardigan which would be in shadow.

now blend with circular motion using the lighter 'primrose' and colour down to where your image fades out.

taking 'duck egg' blue, do the folds and shadows on the cardigan.

go over what you have just done and slightly futher with 'cool aqua'

and thats the colouring finished!!!!!!
onced dried the colours will look paler.
to finish I have added some tiny stick on pearls for buttons and slightly gone around the image with coloured chalk in lemon which you cant see very well on the pic!!
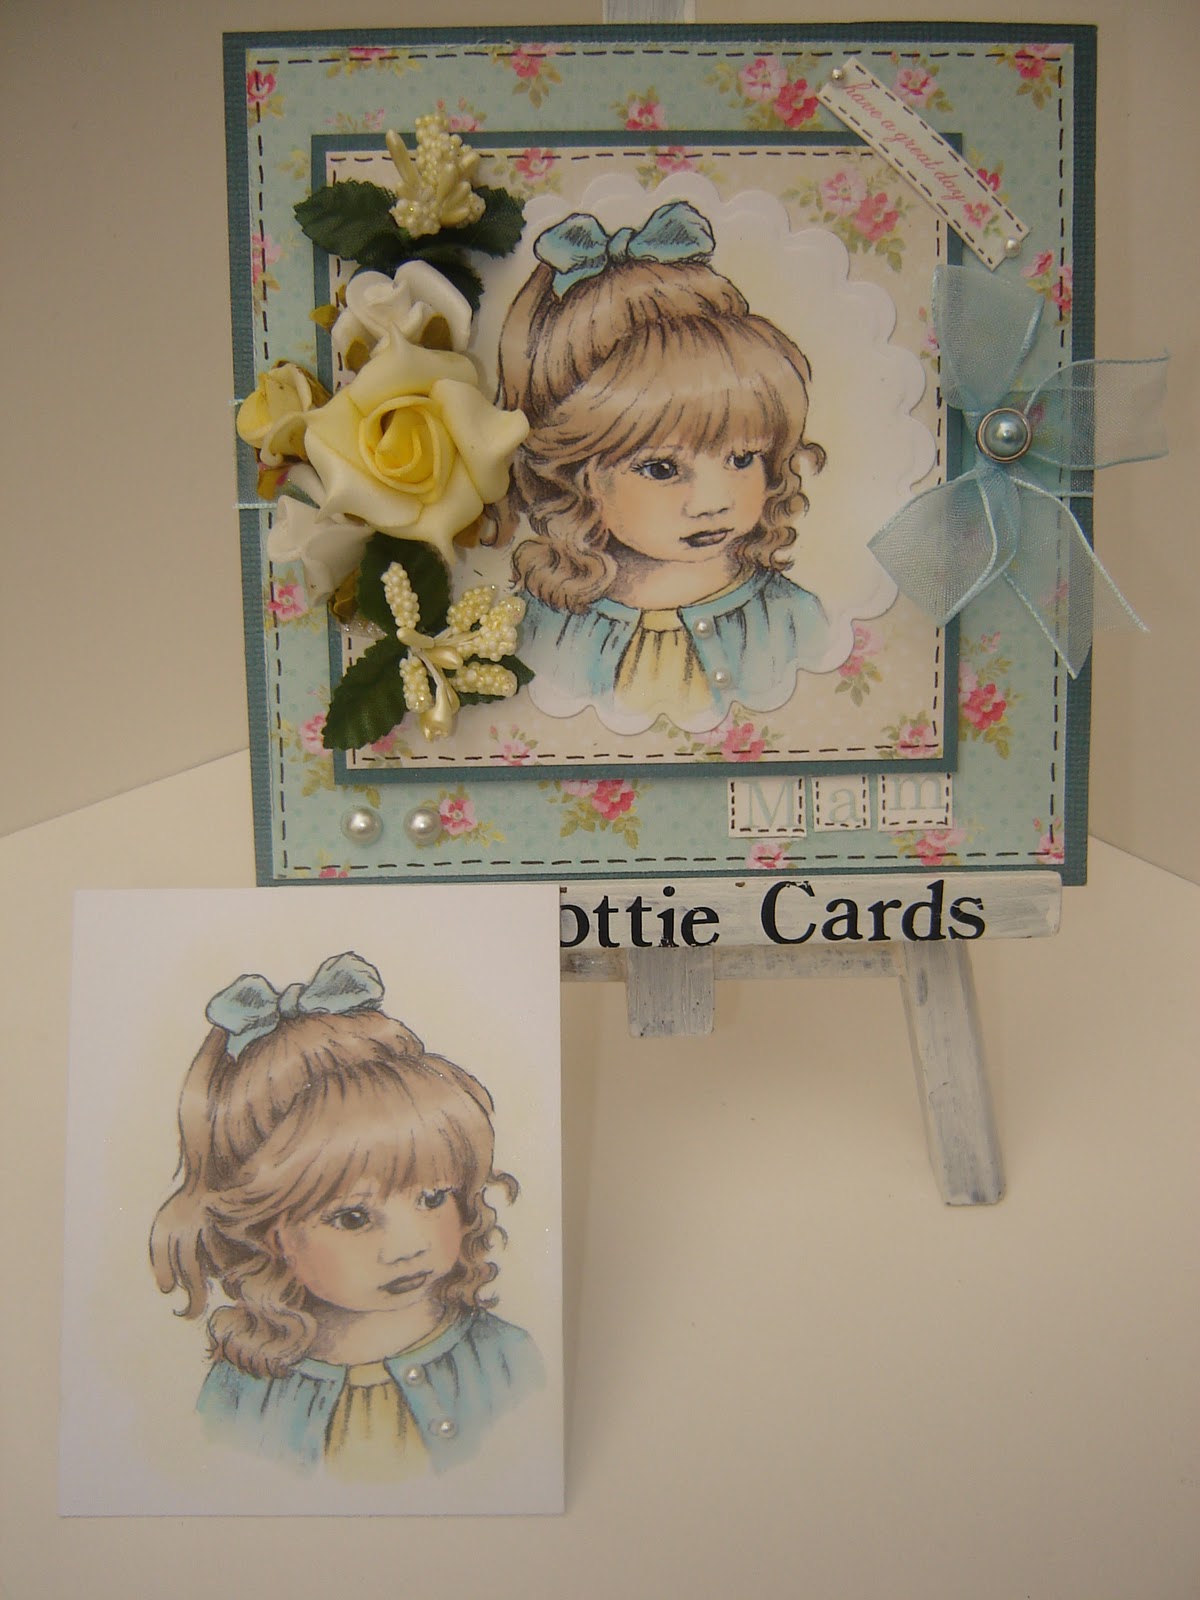
Now all that is left to do is add your beautiful image to your card x here i have shown the image I have just coloured next to a card i made earlier!!!!
thank you for looking at my tutorial and I would so appreciate any feedback on it by any comments added xxxxxxxxxx
hugs redrottie xxxx


32 comments:
what a fab tutorial,thanks karen,x
Fantastic - thank you. I also use darker colours first but don't get the same great effect as you - off to practise some more.
thanks karen your tutorial is great and i love your card sue xxxx
Great tutorial Karen, I will finally be able to give things depth & life instead of flat colours.
Karen your tutorial is great!! well done must copy what you have done as I am always envious of all the lovely images everyone are doing these days must pluck up some courage and maybe buy colours when at the NEC and have a go doing one myself for a change!!
Thanks.....
Ah, found the comments box! Fab tutorial. xx
Very clear tutorial, lovely image beautifully coloured and a fantastic finished card. Sarah
brilliant tutorial - thanks
Thank you for a fab tutorial. Will be trying this way out, really makes sense. Fiona xx
Brilliant tutorial. I come back to your blog time and time again since I discovered it. Thank you for your lovely tips.
Thank you so much for the tutorial, i sure have learned a lot from it, i will certainly visit your blog again...Sylvia x
Brilliant tut Karen, thank you so much.............
Liz x (do crafts)
Karen love your tutorials they are so detailed love your cards too and as for Kayla well she is just gorjussand a big lick back to her
Jacki xx
thankyou for sharing your talent xx
Great tutorial :-) xxx
Fab tutorial. Am learning alot about promarkers. Karen x
fab tutorial thanks for sharing your talents
thank you for a great tutorial x
Thanks for that - I bought this stamp at the SECC but have been scared to use it as the thought of colouring it was putting me off - off to have a go right now........
thank you so much for your help i am begining to understand how this shading lark works lol
feel a bit like a stalker been on your blog all day !
Katex
(samsweep)
Thank you for a very helpful tutorial!
Kathkat.
Lovely tutorial. I found it so helpful. Thank you Karen. Ruthxx
Just Love it. Your tuts are brill. It is now saved to my faves and will be looked at frequently. I love your style of cards - very pretty. I am learning about Promarkers too which is great. Thanks Karen
Wendy L
Just seen your brilliant tutorial !i am totally useless at colouring ,i dont even know where the light would hit ,i would love to colour like this ,but will need to get more variety of promarkers as i dont have many ,then i can try this out thanks x
hi just stumbled onto your blog i use promarkers quite a bit(although im into vinage) bit i do and still find them hard to get right no matter how i practise and like you i go in with darker colours first...so loved the tutorial..and have become a follower..thanks fo the help and yes i DID find this very helpful indedey hugs sassyx
Thoroughtly enjoyed your tutorial on colouring with Promarkers, I have wondered how it was done. Stumbled onto your blog. Thank you. Marlene
Thank you so much, this is absolutely brill! Your work is gorgeous, and so is Kayla, big hugs to you and her! xx
Very good tutorial will refer back to it i am sure - I always thought you started with the ightest colour first but i will have a go this way roundnow
Thanks
Mandy
absolutely brilliant tutorial Karen - sooooo helpful - thank you - kym xx
thanks for a really great and very useful tutorial, i especially love the mousy hair! thanks
Wow, thanks so much! All my faces and hair look so "flat" but now I will follow all your guidance. THANKYOU,
Lou x
Thanks for a great tutorial. I like the way you colour images.
Post a Comment